Falling in love with Autumn again...

I think most of us are pretty much ready for that cool crisp fall weather to arrive ...
Well at least I am...
      So I figured since "Miss Autumn" has arrived
           how about we whip up some pretty "DIY" Fall Decor
                 and get in the mood for that colorful season to come...

 Picture Perfect Fall 

Create a special Fall picture wall...
This could also be a great family fun project...
So on your next stroll through the park go ahead and collect a bunch of pretty colorful leaves place the pressed leaves into various picture frames and as a final touch add your favorite "Fall Poem"

Fall Dawn


Love this one ....
Take a pretty decor glass ball add a tea light and place it on a decor plate...
next take some soft moss, a few twigs & nuts and lay them around the glass ball...

High on Fall


Again on your next nature walk collect various different "Nature Treasures" i.e Twigs, Roots, Pine Cones, Nuts etc... place them in a circle on a decor plate add a few shiny glass balls in the center

Candled Cones


Take a wooden decor plate... add some soft green moss and a little silver string place a few Pine Cone Candles

Matters of the Heart


Simply add just a little extra decor to your candle sconces...
Take a couple hearts made of twigs, add some Mulberry's and a few Green leaves... tie them with a pretty ribbon to your sconces...

Fall Glitter Ball

Place a simple wreath on a decor plate...
add a little glitter and a few tiny leaves to the wreath....
next take a large glass ball (Christmas decor) fill it with a small string of Christmas lights and some more glitter and set it in the center of the wreath

Fall Forrest Paths

Take a fish bowl or a big round vase...
add some leaves, pine cones, small twigs maybe a few pecans
then place a glass candle holder add a candle/tea light in the center of the bowl

Wreaths of Fall

 
Make beautiful decorative wall ensemble with three different sized wreaths... wrap each with a small leaved vine & tie them together with a fall color ribbon 
 
 I hope you will enjoy the beautiful Fall

I know I will, it is my favorite time of the year


Arriving very shortly... Miss Autumn...


Everyone knows that the lovely Fall is right around the corner
and before we know it the leaves will turn colors and everything will look just amazingly beautiful

So I figured to get you in the Fall mood why not create some pretty Fall Centerpieces

They are perfect for someone that really doesn't like those huge elaborate "Flower Power" arrangements yet still would love some kind of pretty table decor

Well and if you ask me I think "Less is More" anyway
                                       and of course as always they are easy to make...

One single decor piece requires the following items:

  • Two 8" x 10" clear acrylic sheets (-> Lowe's Glass cutting area)
  • Leaves... a bunch of pretty colorful leaves (-> Michael's)
  • Simple Glass cups (one per setting)
  • Small candles - simple or not it's your choice
Here is how you do this fun project: 

  1. Take one, two or three acrylic sheets - depending on how many you are making and lay them on your table 
  2. Place the flattened leaves and or petals on top
  3. Cover the leaves and or petals with the remaining acrylic sheets
  4. Place the small candles in glass candle holders on top of the acrylic sheets...
and guess what .....
 Voila all done


Let the Sun' shine already...

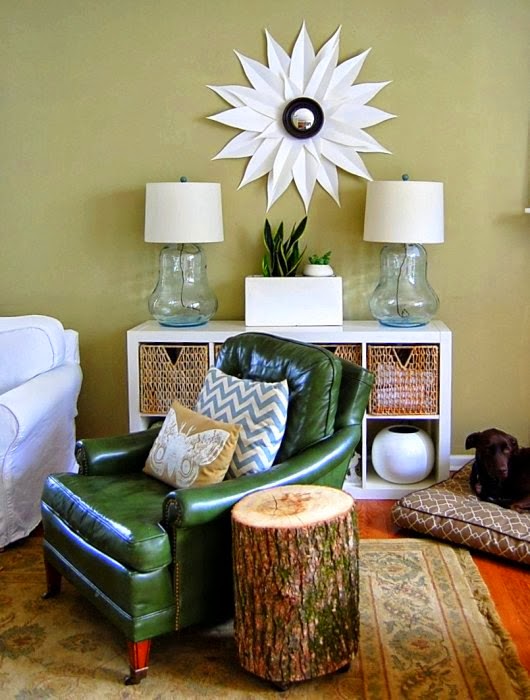
Check out this beautiful DIY Wall Decor 
Sunshine Mirror

Believe it or not...
        this fabulous looking Sunshine mirror will cost you no more then $5.00   
               because it is is simply made with one round mirror and some craft paper 

 What you think...
            You have some room left for just one more gorgeous DIY'er art project ??
 
     Here is how you do it ->

  1. 
Make yourself a template -
   so all your paper "sun rays" will look the same
One easy way to do this is to take about three folds of toilet paper
   and just cut the tips off as shown in the picture
2.
Next cut your decorative paper into several equal size strips
   and fold them in half...


Then cut your decorative paper strips according to your paper template
3.
Make sure that the round mirror you choose for this project is not too big

Since you always want to be sure that you like what your final project is going to look  like test it out first... just to be on the save side!
Just lay the mirror on a flat surface and place the "sun paper rays" around the mirror (see above)   

  4.
In order to be sure that your "Sunshine Mirror" actually looks like a sun
   and not like a flower 
   
You may want to add several different sizes of paper "sun rays" - 
   which will make it look even more interesting

5.
This is actually the most important step...
  Arm yourself with your Hot glue gun and glue on your "sun paper rays" 

Lay your mirror upside down on a flat surface
   and make yourself some marks as shown in the picture above...


Take your hot glue gun and start with the shortest set of "paper sun rays"
   then the next larger set of "rays"... and so on
      Be sure you glue your paper sun rays in a set of four (see picture) 
__________
When the sunshine mirror is finished...
   let it dry for just a little while and then you can hang on your wall
This surely is one pretty
"Sunshine Mirror"


What time is it... ✰ BATMAN ✰

I just know you love this awesome
BATMAN CLOCK

Because it is the missing piece in any Batman Themed Super Hero Room
Now... believe it or not but this -DIY- clock is actually really simple to make AND it will cost you less then $10.00
First let's make sure that you have everything you need....
Materials Required:
  • Paper version of your design
  • Plywood or MDF board (thin)
  • Quartz Clock Mechanism (Ebay)
  • Primer or PVA Glue (if using MDF)
  • Black Acrylic Paint
Tools Required:
  • Pencil
  • Hobby Knife
  • Jigsaw
  • Sandpaper
  • Sticky Tape (optional)
Step 1: Choose Your Design
Obviously you can choose any of your favorite Super Hero Logos
But today it is Batman time


Print out a copy of the Batman logo outline (see link), make sure you enlarge it to your desired size... then tape the paper with your logo outline to your wood board... and with your pencil draw the outline of the logo onto the board
 
Step 2: Cut out the design


Next take your Jigsaw and carefully cut out the design...
you may also have to use a "Coping Saw" for the piece between the ears
because the Jigsaw blade could be a little too big...
After you have cut out the logo take your sandpaper and go over all the edges
just to be sure they are nice and smooth
  Step 3: Prep and Paint


Next make sure that you seal the edges of the MDF board with your primer or PVA Glue... let that primer dry all the way before you apply your base coat of black acrylic paint... Again, let it dry and add one or two more coats of black paint
Step 4: Adding Quartz Mechanism


Next make a small mark where you like the clock hands to be and drill a hole for the hands, once you have drilled the hole it will be very easy to add the clock mechanism...
Don't forget your batteries... and finally
Hang up that super awesome Batman Clock 


Voila - All done 
  
First seen on Instructables

Mamma MIO... my oh my...


I bet you thought that walls with Wallpaper are supposed to just sit flat & plain...
and sort of blend into the background in a boring kind of way
 Guess what...
        You were wrong...
                 because I am here to tell you that the times of the boring plain wall paper,
                        two-dimensional wall tiles and plain ole' paint are finally over!

                         Meet MIO... 


 One awesome design company that has dedicated itself to
          making the world a better place simply by bridging the gap
                 between business and sustainability through really great design ideas


 In a absolutely "papertastic" kind of way
MIO designed these great looking Paper Forms 
which are definitely a new concept in surface coverings
giving you the ability to customize and re-define
              that bland wall space of yours on a budget...

MIO Paper Forms allows you to transform any room in just minutes
                adding color and texture to an entire room or just one single wall
 

You can create your own pattern variation by simply rotating the tiles...
 or painting them in your favorite colors


  These wall decorations are simply perfect....
especially if you need to hide any wall imperfections


 They also give really cool light deflections


  MIO Paper Form Wall Panels are not just stylish and dimensional
they are also Eco-friendly and of course paintable

Give your Walls & Ceilings the "WOW" effect


They can be used for decorating...


They look great in Professional Offices...


Trendy Restaurants...


Beautiful Shops & Boutiques...


Gorgeous Beauty Salons & Spa's


Cute in Daycare's & Schools


Perfect for decorative 3 D Wall dividers


& Absolutely Cool Wall Art Projects


 MIO Paper Forms are available in SEVEN different patterns


MIO Paper Forms are easy to install... 


easy to paint and are a great substitution for wall paper

MIO Paper Forms are lightweight recycled paper modules
          they come in packs of 12 one square foot tiles
                and can be installed temporarily with double-sided tape
                       OR permanently with wallpaper paste

_______________________________

What are you waiting for...
transform your plain boring walls into amazing looking walls
with MIO Paper Forms for less then $100.00 
_______________________________
Check out MIO Culture... 
I am telling you they are amazing

Giving you a reason to hang it up.....

Check out this awesome little hang out up spot ...
You know we all could use one of those neat corners,
if anything at least we would never have to search for our key's again because they finally have a place where they belong...


Of course as far as I'm concerned with all of our cool DIY projects there are no rules as far as what colors or theme's you prefer this or any project to be ....
Our general rule of thumb is "whatever floats your boat"
However just to give you some ideas I figured why not list a few really unique fabrics and hooks that I found on Etsy
I think would work really well with this project....


Toile Fabric Blue European Landmarks (Etsy)

While searching up and down the "Etsy coast"...
I also happened to come across some really cool hooks that would work perfect with our little project...


So what do you think...
You ready to rock n' roll with this awesome project???

If so then here is everything you will need: 
  •  Three (3) Natural Wood Particle Board (12" x 4' - Lowes/Home Depot)
  •  Decorative Fabric preferable with a Theme of your choice (1.5 yards)
  •  Solid Fabric (1/2 yard - preferable matching the background of your other fabric) 
  •  Printable Iron on Fabric sheeting (JoAnn's or Michaels) 
  •  Batting
  •  Three (3) Decorative Hooks
  •  Scissors
  •  Screws & Screw Driver
  •  Staple Gun
  •  Iron
This is how you do it:
  • From your decorative fabric cut out one of your most favorite scene or building
  • Take it to your closet Kinko's/Copy shop and ask them to copy the design of the small fabric piece onto the larger printable fabric sheet (8" x 11")
  • Now take one of the wooden particle boards and cover it with a thin layer of batting material
  • Next take your decorative fabric and place it on top of the board (&batting)
  • Fold the fabric neatly over the edges of the board and staple it in the back
  • When pulling the fabric over the edges make sure you keep the design straight and without wrinkles...
  • Repeat the same process with the second wooden board...
  • Take the third board and cover it the same way as the first two except this time use the solid fabric
  • Next take your previously printed iron on fabric sheet and place it close to the bottom center of the board - then take your pre-heated Iron   and carefully go over the sheet several times until it completely sticks to the solid fabric
  • Finally screw the decorative hooks into the board (center/top)
  • Now find a good spot in your house for this awesome creation...

Voila... all done
Happy hanging....

It's Summer Summer Summer time ....

Well almost... 

But I am sure you are about as ready as I am....
         and you can hardly wait for this years relaxing beach summer fun time

So, while we are waiting we might as well do something creative...
               something that will get us in our favorite Summer time mood
                                 something like this little DIY Beach Fun Deco project...      

Ocean themed candle lights

 >>>> <<<<
What a quick and easy deco idea... and all you need is:
  • Tall Drink Glasses
  • Glass coasters or dessert plates
  • Some pretty Ocean theme pictures or post cards
  • Transparent or Tracing Paper (Printable kind)
  •  Superglue
  •  Tea lights 
  •  Sand 
  •  Sea shells  
 >>>> <<<<
Easy does it...
  1. Copy your Ocean theme pictures onto your transparent paper
  2. Take the super glue and dab a little onto the back edge of your transparent picture 
  3. Place the glued side of your picture onto the glass then add a little more glue to the second back side of your picture 
  4. Wrap it tightly around the glass and wipe off any access glue 
  5. Place the now pretty decorated glass onto the coaster or dessert plate - sprinkle some sand and a few decorative shells around it.... 
                 Voila all done.... 
Quick and easy as always
 >>>> <<<<

Little Tiny Super Hero...


Everybody knows that it is always much easier when it comes to choosing the perfect Nursery Design for our precious little future Princess... because how can you ever go wrong with choosing the usual  pinks and purples...
But having had two boys myself, I always believed that boys deserve something just as precious or perhaps something just as perfect...
 
So how about this amazing Nursery Design...
it is more then perfect for your little tiny Super Hero


Like I said...
If this isn't one sensational Nursery Design, then I don't know what is...
You just have to make sure that in order for the room not be too masculine
that you are selecting a comic book pattern with a more vintage touch...


Also come to think of it, the best part of this unique design or it's color choices...
it could mean that you may not have to change the room until he moves out! Because we all know how important it is to remain a undercover superhero way into adulthood
(OK OK... just kidding)  

Pick up little Superman decor "knick knacks" which you can find pretty much anywhere for just a few bucks and they will look awesome especially with your larger pieces...


... like these awesome window treatments -
Curtains with a Superman theme


Can you say -> "S" for...
 SUPER COOL CORNICE BOARD


Obviously this nursery decor is NOT your standard classic traditional kind of decor
for your little boy, but you can trust me when I say that he will definitely enjoy himself...
          while dreaming big dreams in this absolutely cute & cozy

Superman Theme Crib Bedding

   Little Super Hero Crib Quilt

What little one wouldn't want this
Bedspread with the big "S" 


Beautiful color coordination in every detail...


made with this beautiful high end designer fabric from Kaufman


Of course we must always help him out with some artsy inspirations
from a few comic books so his tiny super hero imaginations can run wild... 


Well we already established the fact that this room will be anything but traditional...
therefore why not add one great looking Black leather sofa...


and for some extra funky spunky color
       just add one of those big round sofa cushions
in Red... or Blue or even in Yellow 


As far as any of the cool wall art work...
they were custom hand painted by a friend of the "little super heroes" mommy
But if you don't have one of those talented friends you can let us know...
we love to create some beautiful Custom Pop-Art for you...
with the promise that it wont break the bank...
OR you can also check out our
           "Not everything Supersized has to be bad" blog post...
With explanations on how you can create any size wall posters
from any image for "FREE"...


One powerful collection of various superheroes...


Excerpt from the Spiderman comic book as decoration


YOU want this!!!!!

Well...I knew you would like this....
and now you want this for your little Super Hero... DON'T YOU!!!

Well that is no problem at all...
Just contact us and we will work out the details for you and get started on your
 Super Hero Custom Nursery...  

Custom Window Panels - starting from $65.00 ea
Custom Cornice Board - Special Design - starting from $120.00 
Custom Crib Bedding - Crib Quilt  

Super Hero Pop Art - Hand painted - $25.00 ea

E-mail us for details


Nixon's MTV Crib -> 05/2011
Photos by Cristi Dame