Light up your Summer Night Party...

 ... with Rainbow Glow Lights of the Deep Blue Sea


Have you ever had a chance to experience the captivating glow of the mysterious jellyfish... those translucent creatures of the Deep Blue Sea...

Well how about turning your next Summer Night Dinner Party
              into one enchanting & captivating experience after dark...
                        by adding these stunning "Glowing Flowing Sea Lights"....

 ~~~~~~~~~

I know you can't wait to start this amazing project so here is what...

You will need ->
  •  One round Plastic Bowl each - White or semi-transparent (approx 15" inches)
  •  Textured Rice Paper in White and Pink (Arts & Craft Shop)
  •  Organza ribbon in White and Pink, about 1-2" inches wide
  •  Bookbinding Glue or Wallpaper Paste
  •  Hot Glue Gun
  •  Flat brush
  •  Packing Cording - White
  •  Scissors
  •  Drill
  •  Light kit for hanging Lanterns (ie Hemma Cord Set by IKEA) 

Step by Step instructions ->
  • First drill a larger hole in the bottom of each bowl, this is where your will string your lantern light kit through in the end
  • Take Six (6) equally long pieces of the White packing cord and glue them with your hot glue gun onto the bowl. 
  • Place them so that the round surface is divided into six equal segments (see pic)


  • Now take the Pink Rice Paper and cut it into wide strips. 
  • With your brush apply the bookbinding glue and place your pink paper strips over each packing cords
  • It is ok for the paper strips to overlap about 4" inches at the end of the bowl


  • Repeat this with a second layer of Pink Rice Paper
  • Repeat step #3 with two layers of white rice paper, let everything dry completely


  • Now cut your organza ribbons in three different lengths 
  • Take your hot glue gun and glue the organza ribbon strips inside the bowl
  • Start with the longest ribbon first and alternate colors -> First one White... -> then one Pink strip
  • Repeat this task with the second set of the organza strips and finally a third time with the shortest strips. 
Make sure to be very careful while working with that hot glue gun because it can easily damage the plastic bowl as well as the organza strips
  • Once all the strips are glued on take a scissor to curl your ribbons (same method as wrapping a birthday present)
  • Finally, take your Lantern light kit and string it through the large whole in the center of the bowl. 
Also make sure you use halogen light bulbs that way your organza ribbons will NOT catch on fire 

Look at this... simply breathtaking


Summer Night Party... Part II

Let's assume that you have successfully completed those breathtaking  
"Glowing Flowing Sea Lights" from our previous blog...
Now you are now ready to get busy with the pretty hand painted Coral Tablecloth

     You know... that missing piece before to your next Summer Night Dinner Party...

          and I know you can't wait to finally finish the entire project...

              because Summer already took way to long to get here...

~~~~~~~~~~~

You will need ->
 

  • Plain Tablecloth - White or Natural 
  • Coral Templates (PDF - Document included below) 
  • Fabric Paint or Fabric Markers (i.e. Red, Coral, White, Cream) 
  • Pencil or Chalk
  • Fine Paint brush
  • Tape

Step by Step Instructions ->

  • Pre-wash tablecloth... dry fabric
  • Iron out wrinkles without using spray starch


  • Lay tablecloth on a clean surface...
  • Position your coral templates on the edges of the fabric
  • Secure the templates with tape to your fabric
  • Outline the templates slightly with chalk or pencil


  • Take your fabric paint and brush and fill in the different Corals (one of each - just like our picture)
  • Finish each Coral by edging them with a slight shade of gray

How to care for your Tablecloth ->

  • Allow to dry 24 hours then heat set (... two heat setting methods):
Dryer Method ->
  • Place the fabric in your dryer for 30 minutes on highest setting allowed for the type of fabric used
Iron Method ->
  • Place the painted fabric right side up on ironing board...
  • Cover with dry pressing cloth. Set iron to highest setting allowed for fabric used
  • Place dry iron for 30 seconds (NO STEAM) on painted area...
  • Lift iron...  moving to another area until all sections are heat set
~~~~~~~~~~~
Also remember...
in order to increase the durability of your pretty tablecloth it is always best to hand wash in cold water and then line dry it... or if washing by machine make sure you always use cold water and a mild detergent on a gentle cycle

~~~~~~~~~~~

NOW...
You are finally ready for your next...
>> Super Summer Night Party <<


Twinkle... Twinkle... little Baby Star...

                                                                          ★     ★    
                   How I wonder what you are...
                               Up above the world so high...
Like a diamond in the....

"Starry Baby Ceiling Sky"


Don't you just love this...                
    Not only is this decor idea as easy as pie... it is also super cheap
    Well and most of us like things that are easy to do...
    and that won't rip a huge hole into our Budget...

                   Also...
                          once your little one grows out of it
                             or once they no longer want to be cute & cutely
                                this special "Starry Sky" can be easily removed
                          

First things first...
                                            Pick a pretty paint color for the ceiling...


I personally recommend a light color (i.e White or light Blue/Pink)
Also... make sure you let the paint dry all the way 

Next...
    Measure the ceiling and figure out how many stars you will need...


 Measure distance between the stars...


Now...
   With the easy to erase pencil mark a "grid" on the ceiling...


...it will be your guide for where you later glue the stars


For the stars you want to choose a adhesive foil in either Gold or Silver...
         those two colors will shimmer beautifully in the evening

 
Next...
    Take your "Star Stencil" and mark the stars on the adhesive foil...
         then take a small precision knife or scissor and cut out each individual star


 ...take the stars and place them where your grid lines intersect

  Once you are finished placing all the stars onto the ceiling...


take a soft damp cloth and clean the grid lines off the ceiling

Now look at this...
           isn't this idea just absolutely BEAUTIFUL


For this fun DIY project you will need...
  • Paint for the Ceiling (light color)
  • One Star Stencil (about 5")
  • Marker
  • Adhesive Foil - Silver or Gold
  • Pencils (easy errase - that way your guides can easily be wiped off)
  • Scissors or Precision Knife

Let the Sun' shine already...

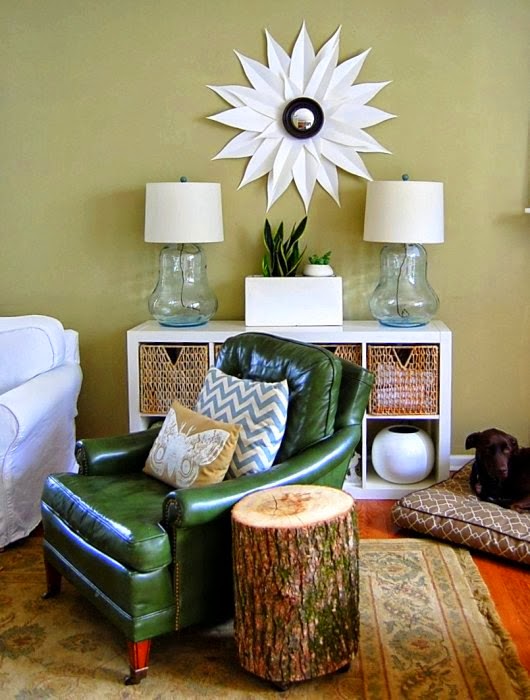
Check out this beautiful DIY Wall Decor 
Sunshine Mirror

Believe it or not...
        this fabulous looking Sunshine mirror will cost you no more then $5.00   
               because it is is simply made with one round mirror and some craft paper 

 What you think...
            You have some room left for just one more gorgeous DIY'er art project ??
 
     Here is how you do it ->

  1. 
Make yourself a template -
   so all your paper "sun rays" will look the same
One easy way to do this is to take about three folds of toilet paper
   and just cut the tips off as shown in the picture
2.
Next cut your decorative paper into several equal size strips
   and fold them in half...


Then cut your decorative paper strips according to your paper template
3.
Make sure that the round mirror you choose for this project is not too big

Since you always want to be sure that you like what your final project is going to look  like test it out first... just to be on the save side!
Just lay the mirror on a flat surface and place the "sun paper rays" around the mirror (see above)   

  4.
In order to be sure that your "Sunshine Mirror" actually looks like a sun
   and not like a flower 
   
You may want to add several different sizes of paper "sun rays" - 
   which will make it look even more interesting

5.
This is actually the most important step...
  Arm yourself with your Hot glue gun and glue on your "sun paper rays" 

Lay your mirror upside down on a flat surface
   and make yourself some marks as shown in the picture above...


Take your hot glue gun and start with the shortest set of "paper sun rays"
   then the next larger set of "rays"... and so on
      Be sure you glue your paper sun rays in a set of four (see picture) 
__________
When the sunshine mirror is finished...
   let it dry for just a little while and then you can hang on your wall
This surely is one pretty
"Sunshine Mirror"


What time is it... ✰ BATMAN ✰

I just know you love this awesome
BATMAN CLOCK

Because it is the missing piece in any Batman Themed Super Hero Room
Now... believe it or not but this -DIY- clock is actually really simple to make AND it will cost you less then $10.00
First let's make sure that you have everything you need....
Materials Required:
  • Paper version of your design
  • Plywood or MDF board (thin)
  • Quartz Clock Mechanism (Ebay)
  • Primer or PVA Glue (if using MDF)
  • Black Acrylic Paint
Tools Required:
  • Pencil
  • Hobby Knife
  • Jigsaw
  • Sandpaper
  • Sticky Tape (optional)
Step 1: Choose Your Design
Obviously you can choose any of your favorite Super Hero Logos
But today it is Batman time


Print out a copy of the Batman logo outline (see link), make sure you enlarge it to your desired size... then tape the paper with your logo outline to your wood board... and with your pencil draw the outline of the logo onto the board
 
Step 2: Cut out the design


Next take your Jigsaw and carefully cut out the design...
you may also have to use a "Coping Saw" for the piece between the ears
because the Jigsaw blade could be a little too big...
After you have cut out the logo take your sandpaper and go over all the edges
just to be sure they are nice and smooth
  Step 3: Prep and Paint


Next make sure that you seal the edges of the MDF board with your primer or PVA Glue... let that primer dry all the way before you apply your base coat of black acrylic paint... Again, let it dry and add one or two more coats of black paint
Step 4: Adding Quartz Mechanism


Next make a small mark where you like the clock hands to be and drill a hole for the hands, once you have drilled the hole it will be very easy to add the clock mechanism...
Don't forget your batteries... and finally
Hang up that super awesome Batman Clock 


Voila - All done 
  
First seen on Instructables

Little Tiny Super Hero...


Everybody knows that it is always much easier when it comes to choosing the perfect Nursery Design for our precious little future Princess... because how can you ever go wrong with choosing the usual  pinks and purples...
But having had two boys myself, I always believed that boys deserve something just as precious or perhaps something just as perfect...
 
So how about this amazing Nursery Design...
it is more then perfect for your little tiny Super Hero


Like I said...
If this isn't one sensational Nursery Design, then I don't know what is...
You just have to make sure that in order for the room not be too masculine
that you are selecting a comic book pattern with a more vintage touch...


Also come to think of it, the best part of this unique design or it's color choices...
it could mean that you may not have to change the room until he moves out! Because we all know how important it is to remain a undercover superhero way into adulthood
(OK OK... just kidding)  

Pick up little Superman decor "knick knacks" which you can find pretty much anywhere for just a few bucks and they will look awesome especially with your larger pieces...


... like these awesome window treatments -
Curtains with a Superman theme


Can you say -> "S" for...
 SUPER COOL CORNICE BOARD


Obviously this nursery decor is NOT your standard classic traditional kind of decor
for your little boy, but you can trust me when I say that he will definitely enjoy himself...
          while dreaming big dreams in this absolutely cute & cozy

Superman Theme Crib Bedding

   Little Super Hero Crib Quilt

What little one wouldn't want this
Bedspread with the big "S" 


Beautiful color coordination in every detail...


made with this beautiful high end designer fabric from Kaufman


Of course we must always help him out with some artsy inspirations
from a few comic books so his tiny super hero imaginations can run wild... 


Well we already established the fact that this room will be anything but traditional...
therefore why not add one great looking Black leather sofa...


and for some extra funky spunky color
       just add one of those big round sofa cushions
in Red... or Blue or even in Yellow 


As far as any of the cool wall art work...
they were custom hand painted by a friend of the "little super heroes" mommy
But if you don't have one of those talented friends you can let us know...
we love to create some beautiful Custom Pop-Art for you...
with the promise that it wont break the bank...
OR you can also check out our
           "Not everything Supersized has to be bad" blog post...
With explanations on how you can create any size wall posters
from any image for "FREE"...


One powerful collection of various superheroes...


Excerpt from the Spiderman comic book as decoration


YOU want this!!!!!

Well...I knew you would like this....
and now you want this for your little Super Hero... DON'T YOU!!!

Well that is no problem at all...
Just contact us and we will work out the details for you and get started on your
 Super Hero Custom Nursery...  

Custom Window Panels - starting from $65.00 ea
Custom Cornice Board - Special Design - starting from $120.00 
Custom Crib Bedding - Crib Quilt  

Super Hero Pop Art - Hand painted - $25.00 ea

E-mail us for details


Nixon's MTV Crib -> 05/2011
Photos by Cristi Dame